|
In the previous episode we talked about theories, principles, numbers, mathematics and stuff like that. But, we computer-oriented people are all a bit of practicalist — who usually just tend to get bored to death with anything involving a pen and a paper — so let’s get down to business. Let’s see what we really can do and even dish out a bit of source code along. |
|||
|
|||
|
Directory
Planarity revealed Interference rings $0.00 Twisting bars $0.00 Next up |
|||
|
|
|||
|
|||
|
|
There’s three kinds of effects I’ve produced with the MSX: pattern based effects, chunky based effects and character based effects. Pattern based effects dump to the pattern table, chunky based effects to the colour table and character based to the name table. In this article I will go more in depth to the truly most spectacular thing you can do on the MSX1 — that is, before you’ve discovered the character based effects — pattern based effects.
But still on a more general level, somewhere in between the masses of ignorance our demos are achieving worldwide I’ve sensed a bit of disappointment towards the fact that our effects are all so polite; even running correctly on top of emulators and definitely not stretching the limits of MSX1’s hardware features. We’ll, we’d sure like to, but there aren’t any; at least much of use.
When I divided the effects a moment ago an MSX2-demowatcher would’ve instantentionally pointed out the total absence of sprite and videobeam based effects. Yes, I know they’ve multiplexed the four — or whatever — sprites C64 has all over again and we have a massive amount of 32 even without multiplexing. But then the MSX-standard features the four sprites per line limit, a limit that you can’t as far as I know overcome anyhow at all, since the Z80 is too slow to do almost anything during one scanline. Someone correct me if I’m wrong, I haven’t got any numbers one me and haven’t ever tried to overcome the four sprites limitation; I did however try to multiplex the 32 sprites from the upper part of the screen to the lower and couldn’t get even that working.
And as for the videobeam, we’ve already proved it is possible to do raster tricks even without a horizontal retrace or some nice memory place updating the current videobeam line: just make a big cpu-loop out of it, it takes about four NOP’s for one scanline during the retrace. After the effect truly takes up all cpu-time, the display is all flickery and you’ll have to rewrite your music players all over again, but that wouldn’t be a real problem if this trick was of any use which it isn’t. This is MSX1, we haven’t got any scroll registers, just the crummy base registers that all work on at least 6 bits a granularity. The only real use I can think of for this trick is to change the background color (vdp 7) for every row which works fine, but why would you want to since it’s just as possible in SCREEN 2? Aside from that, if I never ever was to touch SCREEN 3 again that could prove to have some implementations: improving the resolution, color flickering, maybe using hires-borders in SCREEN 2 and switching the display mode in between the retrace. But alas, I’m not.
Planarity revealed
Let’s get to the pattern based effects which truly are one form of
art. The display mapping in SCREEN 0, 1 and 2 is planar, that is,
8 pixels of graphics are packed into 8 bits or one byte. Every byte has
two colours, but you can change the colours for every 8×1 a tile -
see the previous article for more on this.
For a 32-bit-programmer this planarity will seem inconvenient, but for us it’s a true blessing and the reason you can make 1×1 dumping effects fast on the MSX. It’s all in the numbers: at 16 colours a chunky buffer will take up one byte to store two pixels. A planar buffer takes one byte to store eight pixels so that’s four times the speed. Remember, it’s all on how fast you can output your effect. Plus we get 1×1 accuracy where chunky pixels can only be four pixels wide on the MSX1. If you’re still a bit confused thinking about the locations of different pixels stored in the byte, don’t be: we’re never going to touch them. Of course it would be dead slow and fiddly to start shifting and masking the byte to alter one individual pixel, but the magic is never to touch anything smaller than one byte, 8 pixels.
If you’re not used to planarity, this will take some readaptation. How do you produce a dumping effect that cannot change every pixel? Just make it row based. A truly simple example would be a vertical scroller: you always dump the entire screen row using the same row from the virtual buffer. You won’t need to change the way the pixels are packed inside the bytes. A horizontal scroller on the other hand wouldn’t be possible in a straightforward manner since for different frames you’d need to alter the positions of the pixels in horizontal direction.
I will now introduce two of my previous effects, the interference rings and the twisting bars. But first let’s correct a few misunderstandings. Someone once claimed these effects take up all the cpu-time. Well, they don’t, in fact, neither of them outputs the 2 kB we could on one blank; so both of them waste precious time just waiting for the vblank, time that could be used for instance to play a background digital sample. In fact, the day I write an impossible effect for the MSX you’ll have my word it isn’t running on the MSX at all.
|
Interference rings $0.00
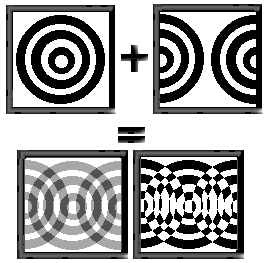
For the principle on interfering rings see figure 1.
Just like we’ve learned in physics, interfering is summing two
waveforms and that’s how we create the interference rings: sum two
images of rings. Now to optimize it for the pattern based techniques
let’s set two restrictions: First, the interfering images can only
move up and down. Second, both the images will be two-coloured with
colours 0 and 1 such that when interfering 0+0=0, 1+0=1, 0+1=1,
1+1=0. After that we can store both the images in planar buffers
and never have to change the way pixels are packed within the bytes since
the images can’t move sidewards. And as for our summing-operations, it
turns out that XOR has exactly the properties required: 0 XOR 0=0,
1 XOR 0=1, 0 XOR 1=1, 1 XOR 1=0. Since our pixels are packed as
individual bits inside a byte, we can XOR an entire of 8 pixels at a
time, at the cost of one operation. After we’re done XORring, that will
be the corresponding screen value, so we can directly output the obtained
value. Here’s the Z80 inner loop for interfering and outputting:
|
Next up, let’s think about the size of the thing. Let’s say our output window is x×y pixels large where x is dividable by 8. As you recall we can do 8 pixels at a time, so this window actually requires x/8×y outputs. As I said in the previous article, we can only do 2048 outputs per frame, so our formula becomes x/8×y=2048. So the window could be for instance 128×128. For this particular effect we will however only use 128×96 for symmetry reasons to get four sets of interference rings on screen: this is what I meant by wasting resources.
|
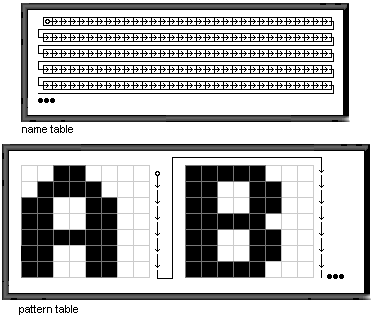
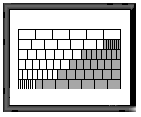
Last of, we’re in a character based screenmode, so we’ll have to consider how to characters are organized in the memory. The basic layout goes as seen in figure 2. As you can see, this could be all right if we wanted to output text, but as far as pattern based effects go, it’s really clumsy. First the eight horizontal neighbouring pixels are packed into one byte. Then the following byte will be the eight pixels below these. After we’re done with the eight rows a character has, we’ll have to move eight pixels back up and eight pixels sidewards. How would you implement anything when dealing with an order like this?
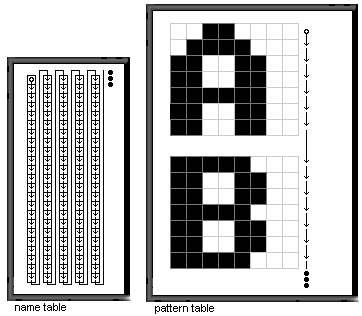
Luckily, we don’t have to. Enter the pseudolinear mode; It’s clear that we cannot change the way the pattern table is formed, but what we can do is change the order of the characters via the name table. We construct our name table to look like figure 3.
|
Check out the source INT.GEN for an example on how this is actually done.
Now, the eight neighbouring pixels are still packed within one byte and we cannot do anything about it, but it doesn’t matter since we never want to touch anything smaller than eight pixels anyway. After that the bytes below each other are stored sequentially in the memory for each column, which is really nice for us. Not as good as a real linear mode, but this is as close as we get on the MSX.
After we’re done with these basics, we can start coding the effect. First, let’s precalc. I used MSX-BASIC, I know it’s slow, but I’ve really no clue how the graphic commands work on my Borland Pascal 1.0 or even if there are any. If someone actually does, please drop me a mail. Here’s the program: [1]. Just type BASIC from the command prompt, then LOAD "MAKEINT.BAS" and RUN. The program first draws the circles and then writes the precalced data which will take a while. About the only thing worth of notice is that we write each column twice: this is because it would’ve been too complicated to check for overflows when actually scrolling and updating two interfering images, so when the display does overflow, it overflows to an other incarnation of the same image.
Now we have the data file INTER.DAT and it’s time to start writing the real effect. Here’s the basic procedure:
- Load the datafile.
- Setup screen mode with one pattern table and colour table for SCREEN 2; see the source code.
- Make an other incarnation of the image from slightly a different position for interfacing. Of course it could, and probably even should, be a completely different image, but I’m going cheap tonight.
- Setup the name table in pseudolinear mode like described above. Use four copies of the same characters.
- Mix the two images and output.
- Update scrolls.
- Go to 5.
Here’s the source code, you’ll need both these files on your diskette: [2] and [3]. Type GEN80 INT.GEN from the command prompt and after that INT INTER.DAT to run. And there you have it. Use SPACE to quit. For a package of all the files and precompiled executables download this package [4].
|
Twisting bars $0.00
Now that we’ve covered the interference rings, let’s get to the twisting
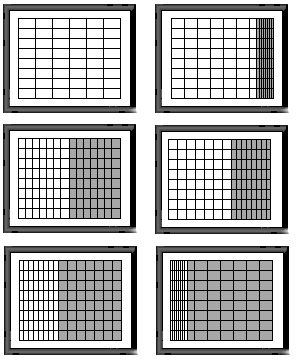
bars. Have a look through this sequence of a rotating bar in figure 4.
This is just an illustration, in reality we will have a real texture
and more frames than just six. The rotation is only pseudo, that is,
we only really rotate about the y-axis, the data for different
rows remains linear.
Let’s have a few restrictions: First, the following face of the bar — marked grey in the picture — should always be the same as the current one, so we’ll only need to store the rotation sequence once and then repeat the same set of images for all the four faces. Second, the texture should repeat itself between a constant number of lines, say every eight rows. After that we only need to store the eight rows of the rotation, the rest is always the same as our pseudorotation is vertically linear. This has got nothing to do with speed, it just saves us some valuable memory. If you feel like it, make all the faces look different and have us large a texture you will, the 40 kB or so won’t fit that much though.
|
After this is done with, we’ll make the bar twist. The principle is as stated in figure 5. It’s really simple: when dumping your bar to the screen, instead of displaying every row using the same amount of rotation, alter it depending on the row. Since we’re going to be working with precalced data, this can be done really fast: just display a different row of a precalced animation for each row. The size our effect is determined just as earlier with the interference rings. Let’s pick 80×192 and use three copies of the same bar twisting about the screen.
I’d like to go through the dumper inner loop in a bit greater focus since it takes a really clever use of the stack on the Z80. The thing is, if you want to load data sequentially, the stack is by far the fastest way to do it... and you get 16 bits a POP so it’s faster to load 16 bits sequentially than it is 8 bits! The only drawback is that you’ll have disable the interrupts because we’re messing with stack pointer and a jump to the interrupt handler would absolutely mess everything up. So if you’re, for instance, using a music player that updates the notes through v-interrupt, you’ll have to divide your dumper to smaller pieces and wait for the retrace in between if the music starts to slow down.
Once again we’re operating with the pseudolinear nametable, so our inner loop would look something like this in pseudocode:
|
Where image is the buffer of prerotated bars and twister has the twisting function that takes the row as a parameter. It’s clear to see that our inner loop requires some more precalcs. Here’s an improved one:
|
Now it looks real good for us, just two table lookups for 8 pixels. The other 16-bit one looks slow though, but this is where the stack steps in. In Z80 the inner loop looks this simple:
|
Let’s precalc. Since I’m a bit of a good programmer implementing good programming style and since we used BASIC for the previous precalc, we’re going for Pascal this time — have I ever mentioned that I truly hate programming theory? — for convenience. Speaking frankly, Pascal is all right for this effect since we won’t be needing the graphical commands for anything. Here’s the source: [5]. You can find the compiled executable ‘pretwist.com’ in the package at the end of the paragraph. There isn’t really much to explain about the source, just draw the rotating bars, convert the chunky data to planar and output to a file. Note that we output the same buffer twice once more, since we want to prevent overflows. It takes 5 kB’s more memory but it’s worth the speed.
After that it’s just the question of coding the inner loop above and that’s about it. Here’s the assembly source: [6] and [3]. Once again type GEN80 TW.GEN to compile and then TW TWISTED.DAT to run. Here’s a package of all of the above: [7].
Next up
Okay, that’s all for now. Be sure the tune in next episode for the
following chapter in this ever-mutating demotutorial series:
Chunky based effects; how to write just as boring effects as seen on
PC-intros and -demos.
Note from the editors:
If you want to see these effects in action,
you could download some demos from the
Bandwagon page.
Antti is too humble to mention this, so we do it instead...